How to Root Samsung Galaxy J7 2015
How to Root Samsung Galaxy J7 and Install TWRP Recovery - On this occasion the CentralAndroid will discuss how to root Samsung Galaxy J7 and install TWRP custom recovery. Samsung Galaxy J7 is an artificial Samsung Android smartphone that has a 5.5 inch screen Super Amoled, 1.5 GB RAM, 16 GB of ROM and front camera 5MP and rear 13MP.
Samsung Galaxy J7 itself currently sold in 3 versions, among others Galaxy J7 2015, Galaxy J7 2016 and Galaxy J7 Prime. To maximize the functionality of Samsung Galaxy J7 as Android smartphone, things to do first is to do a root. Root on Samsung Galaxy J7 is also not too difficult to do. Interested in doing a root in the Galaxy J7 yours? You can follow the guide how to root Samsung Galaxy j7 follows.

Samsung Galaxy J7 itself currently sold in 3 versions, among others Galaxy J7 2015, Galaxy J7 2016 and Galaxy J7 Prime. To maximize the functionality of Samsung Galaxy J7 as Android smartphone, things to do first is to do a root. Root on Samsung Galaxy J7 is also not too difficult to do. Interested in doing a root in the Galaxy J7 yours? You can follow the guide how to root Samsung Galaxy j7 follows.

How to easy Root Samsung Galaxy J7
Need you know, root Samsung Galaxy J7 couldn't do with some applications such as instant root, Framaroot, Towelroot, Kingroot, KingoApp and other similar applications. To do the root, you can use the below way. How this can be done for root Samsung Galaxy J7 2015, Samsung Galaxy J7 2016 and Samsung Galaxy J7 Prime. Before you start doing root Samsung Galaxy J7, which was first to do is to install a custom recovery. At Galaxy J7, custom recovery used is TWRP. If TWRP already installed, then the root can be done. Discussion of how to root and install TWRP in Samsung Galaxy J7 can you see below.
Disclaimer!
Any result over she tried these tips are borne by themselves. As you know, the warranty will be forfeited if yours smartphone doing the process Root. If there is something against you, such as your smartphone soft-bricked or hard-bricked, we will not be responsible.
The beginning of the
- Backup all data.
- Make sure the battery reaches 60% more.
- Download USB Driver Samsung Galaxy J7 and install it on your computer.
- Enable USB debugging on your Samsung Galaxy J7. Here's how Setting > Developer Options > USB Debugging.

- If no Developer Option, you can get them back by way of Setting > About Phone > Build Number (press 7x to bring up the developer option).
- Turn on also OEM Unlock with the way Setting > Developer Options > Enable OEM Unlock.
- Connect your smartphone to your computer using a USB cable, make sure that all the drivers are installed properly.


How to Install Recovery TWRP Samsung Galaxy J7 (2015)
- Download Odin3, extract in a folder that is easily found.
- Download TWRP Recovery Samsung Galaxy J7 and place it in the folder Odin3.
- Turn off Galaxy J7 and reboot into Bootloader. The trick, press the Power button + Home + Volume Down simultaneously, then press Volume Up to enter.
- If it goes into Bootloader or Download Mode. Open Odin on a computer and then connect the computer to the Galaxy J7. The message will appear in the Odin3 Added.
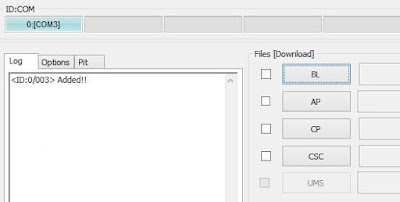
- Checklist AP Button in the Odin twrp-2.8.7.0-j7elte.tar then select the file that is already downloaded.

- Open tab Option. Make sure the Auto Reboot and F.Reset Time have already checked. Make sure also Re-Partition is already not checked. If you are sure, click the Start button to start the process of flashing.
- When it is finished, it will appear the message PASS! in the Odin and TWRP also successfully installed in Samsung Galaxy J7.


How to Root Samsung Galaxy J7 (2015)
- Download file UPDATE SuperSU and place it on the internal memory to be easy to find.
- Turn off your smartphone, and then turn it on again in the Recovery mode. The trick, press the Power button + Home + Volume Down simultaneously.

- While already logged into TWRP Recovery, flash SuperSU.zip. The trick is to Install > Select Zip.

- If already installed, select Reboot System.

- Done.


0 Response to "How to Root Samsung Galaxy J7 2015"
Post a Comment